Privacy statement: Your privacy is very important to Us. Our company promises not to disclose your personal information to any external company with out your explicit permission.
1, check the quality of the serial line
1) Plug the serial cable into the computer and short the 2 and 3 pins of the serial port with a short circuit.
2) Open the serial port debugging assistant
3) Click Auto Send, send a random data in the window of automatic sending to see if you can receive the data sent by yourself if the serial port is normal, otherwise it is bad.
2, after the completion of the microcontroller program, see if the serial port has data detection
3, the meaning of the four lights on the microcontroller communication with the module
1) DO light
Flashing all the time, the serial port communication between the serial port and the GSM module is not normal, otherwise the serial communication is normal.
2) D1 lamp
When the light is on, the module is registered on the network, otherwise the network is not registered.
3) D2 lamp
Lights up to start texting
4) D3 lamp
Lights up to indicate the end of texting
4, the connection between the MCU board and the GSM module
MCU---------GSM module
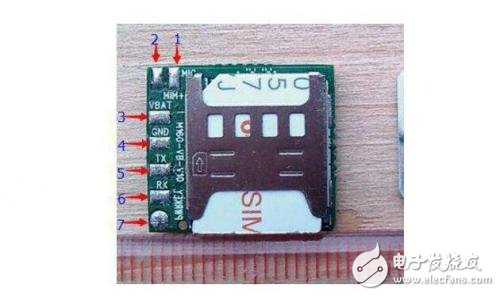
VCC--------vcc (the third leg of P5)
GND--------GND (pin 4 of P5)
RX_232 (indicating the transmission of the microcontroller) ----------- RXDPC_232 (receive of the module (P5 5th foot))
TX_232 (indicating the receipt of the microcontroller) -----------TXD_PC232 (module's hair (P6's 6th foot))

Gsm module and microcontroller connection
When the MCU is connected to the GSM module, the TX and RX of the asynchronous serial communication port can be connected directly. Don't forget the ground wire.
Precautions:1. Different single-chip microcomputers have different voltages. The input and output level of the general GSM module is 2.85V, and the level of the 51 series is 5V. Generally, the 2K resistor is connected in series on the TX output line of 51, which can basically be used. If it is a 3.3V microcontroller, this resistor can be small, a few hundred ohms.
2, GSM module itself power supply and SIM card circuit is very troublesome, first of all, most GSM modules are using FPC40 interface, the spacing of the cable is only 0.5 mm, and it is a plastic case, not good soldering. If the welding is not good, the work is unstable. Secondly, the power supply part is more troublesome. The GSM module has a large emission current and the maximum instantaneous current is 2A! Therefore, the power supply part generally uses the LM2576 high-current DC-DC converter to provide 4V voltage. The DCDC circuit design itself is not easy. Personal application is difficult and requires a circuit board. The connection is unstable. There is also a SIM card part. The communication between the SIM card and the GSM module is a complicated high-frequency process. The circuit has strong anti-interference ability. I have tried to connect them with wires. If it is not ten minutes, it will be dropped. So the SIM card part also needs to be carefully designed. Don't look at only five data lines.
Method for controlling TC35GSM module by single chip microcomputer
1, hardware connection
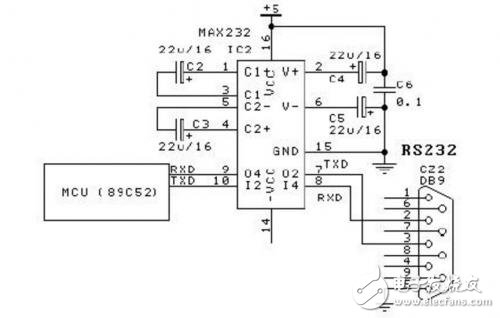
The circuit shown below only needs to design a TTL to RS232 level circuit, connected to the UART port of the MCU, and the other end is directly connected to the TC35.

November 16, 2024
September 18, 2023
June 28, 2024
June 28, 2024
이 업체에게 이메일로 보내기
November 16, 2024
September 18, 2023
June 28, 2024
June 28, 2024

Privacy statement: Your privacy is very important to Us. Our company promises not to disclose your personal information to any external company with out your explicit permission.

Fill in more information so that we can get in touch with you faster
Privacy statement: Your privacy is very important to Us. Our company promises not to disclose your personal information to any external company with out your explicit permission.